Introduction
Creating a custom‑branded cornhole board allows one to showcase a logo while delivering a professional‑grade game experience. This guide explains every phase of the process, from selecting a high‑quality base board to sealing the final artwork for long‑term durability. Readers will learn how to prepare the surface, transfer a design, protect the finish, and assemble the board for tournament‑ready play. By following these steps, anyone can produce a personalized set that looks as polished as a factory‑made product yet carries a unique brand identity.
What You’ll Need
- Regulation‑size wooden cornhole boards (4 ft × 2 ft)
- Sandpaper (80‑grit and 220‑grit)
- Painter’s tape or low‑tack stencil film
- Acrylic paint or vinyl decal material
- Paint rollers or a spray‑gun
- Clear polyurethane sealant (water‑based)
- Measuring tape, pencil, and a level
- Protective gloves and a dust mask
High‑quality boards are the foundation of a successful project. The following products have been selected for their reputation, price, and user satisfaction.
Step 1: Choose a Quality Base Board
The first decision determines the durability and aesthetic of the finished piece. For a balance of craftsmanship and affordability, the GoSports Solid Wood Cornhole Set offers 100 % solid pine construction, mitered corner joints, and a varnished surface that meets ACA regulation standards. Priced at $139.99 with a 4.7‑star rating from 9,003 reviewers, this set includes two boards, eight all‑weather bags, and a sturdy carrying case, providing everything needed for both play and customization. The solid wood core resists warping, which is essential when applying paint or heat‑transfer vinyl.
Alternative options such as the GoSports Wooden Cornhole Set (price $129.99, rating 4.6) or the premium CornholeAce Pro Cornhole Boards (price $279.99, rating 4.7) can also serve as bases, but the Solid Wood Set delivers the best value‑to‑quality ratio for DIY branding projects.
Step 2: Prepare the Surface for Your Logo
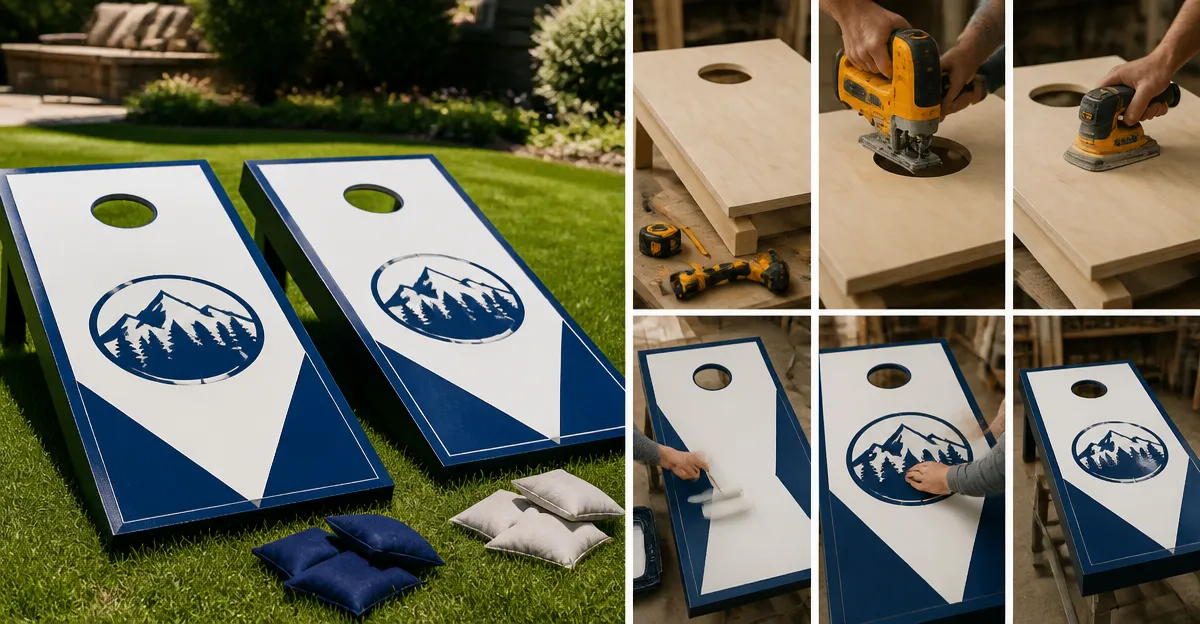
Begin by removing any dust or debris from the board. Lightly sand the playing surface with 80‑grit sandpaper to eliminate the glossy varnish and create a “tooth” for paint adhesion. Wipe the board with a tack cloth to capture fine particles. Follow with a second pass using 220‑grit sandpaper to smooth the wood without removing the grain pattern. This two‑stage sanding process ensures the paint adheres evenly and prevents premature peeling.
If the board already features a pre‑finished stain (as found on the GoSports Wooden Cornhole Set), a brief sanding step is still recommended to break the seal. The result is a uniform surface that accepts both acrylic paint and vinyl.
Step 3: Design Your Logo and Create a Stencil
Use vector‑based software such as Adobe Illustrator or the free Inkscape program to trace the logo at the exact dimensions you desire. A typical cornhole board provides a 24‑inch wide printable area; keep the design within a 20‑inch width to leave a margin for the hole and board edges. Export the file as a PDF or high‑resolution PNG.
Print the design on low‑tack stencil film (available at most craft stores) and cut the open areas with a precision craft knife. For larger logos, consider dividing the artwork into sections and using painter’s tape to mask the borders between cuts. This method reduces paint bleed and yields crisp edges.
Step 4: Apply Paint or Vinyl Using the Stencil
For a traditional painted finish, lay the stencil on the sanded board and secure it with painter’s tape. Apply a thin coat of acrylic paint using a foam roller; this tool minimizes brush marks and pushes paint into the wood grain. Allow the first coat to dry for 15‑20 minutes, then apply a second coat for full coverage. Typical color choices—team colors, corporate palettes, or contrasting hues—enhance visibility from a distance.
Alternatively, a heat‑transfer vinyl (HTV) approach eliminates the need for multiple paint layers. Cut the logo from HTV using a vinyl cutter, weed the excess, and position the film on the board. Apply a heat press or a household iron set to 300 °F, following the manufacturer’s dwell time (usually 10‑12 seconds). This method creates a durable, fade‑resistant finish that can endure outdoor exposure.
Both techniques benefit from the solid wood foundation of the GoSports Solid Wood Cornhole Set, which resists flexing during the application process.
Step 5: Seal and Protect the Finished Design
After the paint or vinyl has cured completely (24 hours for paint, 48 hours for vinyl), protect the artwork with a clear polyurethane sealant. A water‑based polyurethane is recommended because it does not yellow over time and dries quickly. Apply two thin coats with a clean brush, allowing 2‑4 hours of drying between coats. The sealant forms a barrier against moisture, UV rays, and abrasion, extending the life of the custom logo.
For boards that will see heavy use—such as tournament play or frequent tailgate transport—the GoSports Vintage Wood Cornhole Set demonstrates how a professional‑grade clear coat can preserve intricate graphics for years. While the Vintage set includes pre‑printed designs, the same sealing principles apply to any DIY board.
Step 6: Assemble and Test the Boards
Reattach the retractable legs using the 3/8‑in galvanized steel bolts and wing nuts supplied with the board set. Verify that each leg locks securely and that the board sits level on a flat surface. Use a carpenter’s level to confirm that the playing surface is even; an uneven board can affect bag trajectory and compromise tournament compliance.
Place the eight all‑weather bean bags included with the GoSports Solid Wood Cornhole Set onto the board and conduct a short test round. Observe the slide of the bags; if they stick, lightly sand the surface again and re‑apply a thin coat of sealant. This final adjustment ensures the board meets ACA regulation slide standards.
Tips & Pro Tips
- Work in a well‑ventilated area when sanding and applying sealant to avoid inhaling dust and fumes.
- When using acrylic paint, add a small amount of water (5‑10 %) to achieve a smoother flow without sacrificing opacity.
- For a glossy professional look, sand the final sealed surface with 400‑grit sandpaper and polish with a soft cloth.
- Store the boards in the included carrying case (found in the GoSports Solid Wood Cornhole Set) to protect the finish during transport.
- Label the underside of each board with the date of customization; this helps track wear over time.
Troubleshooting
- Paint bleeding under the stencil: Ensure the stencil is firmly taped and consider using a spray adhesive designed for paper.
- Vinyl edges lifting: Re‑heat the affected area for a few seconds and press firmly with a silicone roller.
- Uneven slide after sealing: Lightly sand the surface with 220‑grit sandpaper, clean, and apply a third thin coat of sealant.
- Legs wobble after assembly: Tighten the wing nuts evenly and check that the bolts are not stripped; replace if necessary.
Conclusion
By selecting a reputable base board, meticulously preparing the surface, and applying a well‑executed logo, anyone can produce a custom cornhole set that rivals commercially manufactured options. The steps outlined above combine practical woodworking techniques with modern graphic‑transfer methods, delivering a finished product that is both visually striking and tournament‑ready. Whether the goal is brand promotion at corporate events or a personalized gift for a sports team, the DIY approach offers creative freedom and cost savings.
Products Mentioned in This Guide
Frequently Asked Questions
What size wood board should I use for a regulation custom cornhove board?
Use a 4 ft × 2 ft wooden board that meets official cornhole dimensions and thickness guidelines.
How do I prepare the board surface before applying my logo?
Sand the board with 80‑grit followed by 220‑grit sandpaper, then clean off dust before masking or decal application.
Can I use acrylic paint instead of vinyl decals for my logo?
Yes, acrylic paint works well when applied with rollers or a spray gun, but a vinyl decal offers sharper detail and easier removal.
What is the best sealant to protect a custom‑branded cornhole board?
Apply a water‑based clear polyurethane sealant in two thin coats for UV resistance and long‑term durability.
Do I need special tools to assemble the finished board?
A measuring tape, pencil, level, and basic screws or brackets are sufficient to ensure the board is level and tournament‑ready.